Print Safety Data Sheet containing alternate company (TO) details
You may want to print documents, e.g. a Safety Data Sheet, so that the company and contact details are from an alternate company. This could be the case if your company produces e.g. Safety Data Sheets for your other divisions or sites. To print documents containing other company details, including company name, address, contact and logo involves the following steps:
Add a New TO – the key details of the alternate company.
Add TO logo – to upload the logo of the alternate company.
Add new document content – this is necessary if the document contains TO specific content.
Link the document, TO and company together – so the right company details appear when needed, for the right customer.
Although this guide relates to Safety Data Sheets, the basic process is the same for any document.
Process for adding a New TO
- Go to Add a New TO
- Enter a Code for the TO e.g ‘FORM’
- Enter TO Name e.g ‘Formpak’
- Add address and any other relevant details for the TO
- Click the Contact tab
- Click Add New Contact
- Fill out the relevant details of a contact within the company
- Click Save to save the contact
- Click Save again to save the new TO
Process for adding a Company logo to a TO
- Go to Modify a TO
- Select TO = ‘Company name’
- Select the Attachments tab
- Click Add Attachment
- Select Attachment Type = Logo
- Enter Name = ‘Logo Name’
- Click Browse and select the logo file (Must be PNG format and file size file should be 400-600 x 150-200 pixels)
- Click Save to save the Attachment
- Click Save to save the TO
Process for adding new document content for a document
This step is only needed if the document contains TO specific content. This is the case for the Safety Data Sheet where at the bottom of each page there is an abbreviated company address. The process below reflects the process for changing this specific content.
- Go to Manage Document Content
- In Document Design select document e.g ‘CLP Annex II SDS’
- Click Add New Content
- Enter Code ‘bottomCompany.” followed by the Code for the TO e.g. ‘bottomCompany.FORMPAK’
- Enter the Name and Address into the Content as a single line
- Click Save
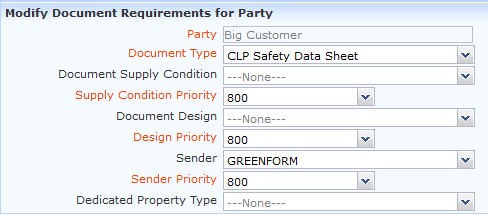
Process for linking document and company together
Documents are printed for companies, usually customers. You can specify which customers receive the alternate document in the following way:
- Go to Manage Document Requirements for Party
- In Party enter the code of the company / customer who requires documents from the alternate TO
- Click Add
- Select Document Type and select the document you want to link e.g ‘CLP Safety Data Sheet’
- In the Sender box select the TO code
- Click Save
When printing the document change the Default TO to see the changes take effect.
|