Batch Set Up
Initial set up is required prior to a using the Batches functionality. Please refer to the information below on how to achieve this.
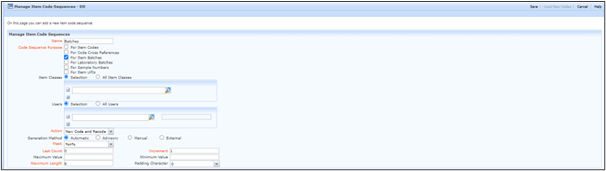
Manage Item Code Sequences
Can be used to specify how codes are allocated to Batches automatically. They can be alphabetical, numeric or both. Item Code Sequences can be assigned by multiple combinations.
Navigate to Manage Item Code Sequences and select Add
Name: Enter your chosen name for the code sequence for Batches
Mask: This gives the structure of the code to be generated.
It is possible to include letters before and after a Mask too.
-
- ‘%n%’ – This mask will be replaced by a number
-
- ‘%L%’ – This mask will be replaced by an upper case letter
-
- ‘%l%’ – This mask will be replaced by a lower case letter
-
- ‘%y%’ – This mask will be replaced by current year. E.g. ‘2016’
-
- ‘%m%’ – This mask will be replaced by current month. E.g. ’07’
-
- ‘%d%’ – This mask will be replaced by current date E.g. ’25’
-
- ‘%t%’ – This mask will be replaced by current timestamp E.g. ‘20160725182805’
- ‘%w%’ – This mask will be replaced by day of week expressed as a digit (‘0’=Sunday, ‘1’=Monday, …, ‘6’=Saturday)
The zeros included in the codes relate to the maximum length parameter which is 6 by default.
Last Count: Enter the last number previously used. If this is a new code sequence, this is most often 0. Newly assigned codes will be the next in the sequence, starting from Last Count.
Increment: Enter a suitable value. Most often this will be 1, i.e., each allocated code will be 1 higher than the previous code.
Maximum Value: Enter a Maximum Value for the Code if required.
Minimum Value: Enter a Minimum Value for the Code if required.
Maximum Length: Enter the maximum number of characters allowed in the number part of the code.
Padding Character: If required select a character(s) that will fill the gap whilst numbers grow. For example, RM to begin the code for raw materials.
Add a New Batch Test Class
Is the ability to configure sets of tests with Property values that determine and record results, for example for quality assurance purposes. Multiple Batch Test Classes can be added for various sets of tests.
Name: Enter your chosen name for the Batch Test. For example this could be for a new Raw Material which is required to meet specific test criteria.
- Description: Add a brief description for the Batch Test if required.
- Overall Status Required: This indicates if an overall Pass, Fail or Undecided Status is required.
- Batch Properties: Insert the required Batch Properties (These can be added via Add a New Batch Property)
- The arrows displayed indicate the order of the Batch Properties.
- Is Required: This indicates if the test is mandatory.
- Item Property: This field is optional and allows the User to specify a Property of an Item (Raw Material or Formulation) which should be shown next to the Batch Property.
- Select Save.
You can also View a Batch Test Class and Modify a Batch Test Class if amendments are required.
Add a New Batch Property
Add a new batch property to reflect information you want to add to Batch Tests. Examples include physical properties or composition properties.
For example, Property values for GC results or Specific Gravity maybe required to determine if a Raw Material meets specific set criteria.
- Code: Enter the Code required for the Property.
- Name: Enter the Name of the required Property.
- Description: Add a brief description for the Batch Property if required.
- Value Type: This field contains a drop down and the appropriate Property Type can be selected for recording results.
- The Choice Property can be used if there is more than one possible response. Multiple Available Values can be added.
- Can be Estimate: Refers to if the Property Value can be estimated or not.
- Select Save.
- You can also View a Batch Property and Modify a Batch Property if amendments are required.
Once the initial set up has been completed new Batches can be added.
Add a New Batch
Input the Item Code (s) or use Add from Basket. Input the Production Date and the date the Batch is required by. Enter the amount of the batch required (kg)The TO will automatically include a default TO (Target Organisation) select the TO from the dropdown menu. Select the Item Batch Sequence (See Initial Set Up).
Select Generate Batches.
The created Batch will now appear, and further Batches for Items can be added.
Select Save Batches. |